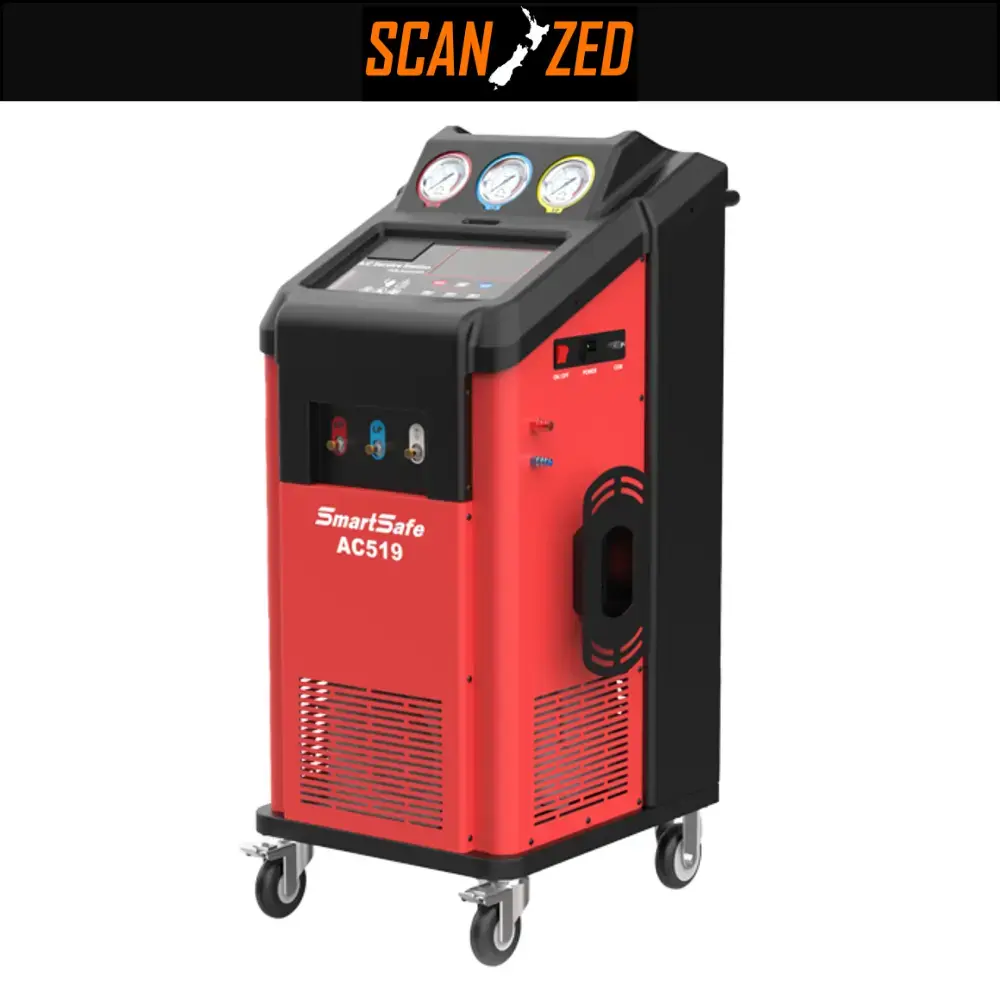
SmartSafe AC519 A/C Service Station, Choose R134A or R1234YF
AC519 is a fully automatic intelligent automobile air conditioning maintenance equipment that integrates functions such as disassembly-free cleaning, refrigerant recovery, filling, and vacuuming. It can effectively improve the problems of poor air conditioning cooling effect, large compressor load, high noise, and high fuel consumption. Supports two refrigerants: R134A or R1234YF
The AC519 A/C Maintenance and Refrigerant Charging Device is designed for automotive air conditioning systems, offering efficiency and precision in addressing A/C issues. This device automatically cleans, regulates gas pressure, and fills the system with the required refrigerant. It is an excellent choice for specialized automotive service stations or repair workshops seeking a high-performance tool for maintaining air conditioning systems with maximum accuracy.
One of the standout features of the AC519 is its ability to measure and determine the amount of refrigerant in the system, as well as effectively remove air and moisture. This enhances the performance and efficiency of the A/C system. The device also provides multiple functions, such as leak detection and monitoring system pressures during maintenance, making the process faster and more accurate.
The AC519 is also equipped with a digital display, allowing users to track each stage of maintenance and charging effortlessly. Additionally, it offers detailed reports on the service operations performed on the system, ensuring a professional and thorough maintenance experience.
A – Fully automatic and easy to operate:
This device operates fully automatically, making it user-friendly. Most processes require no manual intervention, saving time and simplifying maintenance.B – Internal pipes for system cleaning:
The device includes specialized internal pipes to clean the system of oil and debris that accumulate over time. This helps restore optimal system performance and improves efficiency.C – Provides front and rear cleaning functions:
The device employs front and rear cleaning techniques, significantly enhancing the cleaning process and ensuring the removal of any build-ups within the system.D – Vertical installation of high- and low-pressure gauges:
The vertical installation allows operators to monitor pressure parameters instantly, even while working on a vehicle.E – Unique pipe design for high recycling rates:
The unique pipe design ensures efficient recycling of both gas and liquid, reducing waste and increasing the efficiency of the recycling process.F – User-friendly operation with a simple interface:
The device features a straightforward and clear interface, enabling users to perform various tasks quickly and easily, minimizing the need for advanced training.G – Equipped with a large LCD screen:
The device includes a large LCD screen for displaying information clearly and accurately, aiding the user in monitoring operations effectively.H – Built-in database for easy maintenance and information retrieval:
A built-in database stores details of previous operations and maintenance, facilitating easy retrieval and future servicing.I – Programmable updates for software and database:
The software and database can be regularly updated to ensure access to the latest maintenance techniques and information.J – Integrated printer:
The device features a built-in printer, enabling users to print detailed reports of completed tasks for documentation and review.Item Specifications A. Operating Conditions Ambient Temperature: 10°C to 50°C Relative Humidity: Less than 85% B. Input Voltage According to device data plate: AC220V±10% 50/60Hz AC110V±10% 50/60Hz C. Compressor Power 3/8 HP D. Vacuum Pump For 220V: 42 L/min, 5 Pa For 110V: 50 L/min, 5 Pa E. Tank Weight Scale ±10 grams F. Oil Bottle Weight Scale ±5 grams G. Tank Capacity 12 liters H. New Oil Bottle 300 ml I. Used Oil Bottle 500 ml J. LCD Screen 800 × 480 pixels K. Working Pressure Maximum: 20 bar L. High/Back Pressure Gauge (HP/TP) -1 bar to 38 bar M. Low-Pressure Gauge (LP) -1 bar to 18 bar A. Automatic Mode The device operates automatically to complete all processes such as charging, vacuuming, and recycling without manual intervention. B. Cleaning Cleans the system of debris and accumulated oils using advanced front and rear flushing techniques. C. Recycling Effectively recycles gas and refrigerants from the system, minimizing waste and increasing efficiency. D. Vacuuming Removes air and moisture from the system to ensure optimal performance and reduce system contamination. E. Adding New Oil Allows the addition of new oil to the system to maintain its efficient operation. F. Refrigerant Charging Recharges the system with the required refrigerant (coolant) according to the system’s needs. G. Database Includes a built-in database to store information about previous maintenance and charging operations. H. Printing Prints detailed reports of completed operations, facilitating maintenance tracking and data organization. The Electrical Circuit of the Device
To explain the electrical circuit (Circuit Diagram) of the air conditioning system maintenance device, it should include the key components that contribute to the operation of the device. This type of device typically contains several main components such as:
- Vacuum Pump
- Compressor
- Valves
- Pressure Sensors
- Control Unit
- LCD Display
- Database
- Voltage Converter
- Printer
The electrical circuit is usually complex and contains many wires that connect these components through electronic control circuits that ensure automatic operation and sensor readings.
Circuit Description:
- Main Unit (Control Unit): This is the central board that controls all operations. It directs commands to various components such as the pump, compressor, and valves.
- Sensors: The sensors measure the internal pressure of the system. Signals are sent to the control unit to adjust the charging, discharging, and recycling processes.
- Vacuum Pump: The pump is activated through the control unit to evacuate the system from air and moisture.
- Compressor: The compressor compresses the gas to recycle or charge the system.
- Display and Printer: The system status is displayed on the screen, and operation reports are printed via the printer.
Using the AC519 Device for Air Conditioning System Maintenance is both professional and straightforward. The device facilitates system cleaning, gas recovery, charging, and refrigerant recycling. Here is a detailed guide to using the device effectively:
1. Device Preparation:
- Connect to Power Supply: Ensure the device is properly connected to the power source (220V or 110V as per the specifications).
- Check Components: Confirm that all hoses, gauges, and sensors are securely connected and inspect for any gas leaks.
2. Automatic Mode:
- Select Auto Mode: Choose the “Auto Mode” option from the device interface.
- Start Operation: Once activated, the device will automatically perform all necessary functions like cleaning, vacuuming, charging, and recycling.
3. System Cleaning:
- Select Cleaning Function: From the user interface, select the “Cleaning” option.
- Perform Cleaning: The device will execute front and back flushing techniques to remove impurities and oils from the system.
- Monitor Pressure: Use the gauges to ensure proper pressure levels during the cleaning process.
4. System Vacuuming:
- Activate Vacuum Function: Select the “Vacuum” option to remove air and moisture from the system.
- Monitor Low Pressure: Ensure the vacuum pump operates at the required low pressure for optimal system performance.
5. Refrigerant Charging:
- Select Charging Function: Choose the “Recharge Refrigerant” option from the device interface.
- Charge the System: The device will automatically charge the system with the appropriate refrigerant according to the specified pressure.
- Monitor Gauges: Ensure pressure levels are accurate during the charging process.
6. Adding New Oil:
- Add Oil: If needed, select the “Add New Oil” function.
- Check Weight: Use the built-in scale to monitor and add the precise amount of oil required.
7. Recycling (If Needed):
- Select Recycling Function: Choose the “Recycle” option if gas recovery and recycling are required.
- Monitor Parameters: Check refrigerant levels and system conditions during the recycling process.
8. Review the Report:
- Print Report: After completing the maintenance, use the built-in printer to generate a detailed report of all operations, such as gas and oil quantities used.
- Save Data: The device automatically stores all data in its integrated database for future reference.
9. Powering Off the Device:
- Turn Off the Device: Safely shut down the device after completing the maintenance.
- Disconnect from Power Source: Ensure the device is unplugged after use.
10. Routine Device Maintenance:
- Regular Cleaning: Periodically clean the device and inspect components like the pump, gauges, and valves to maintain optimal performance.
First: Regular Cleaning of the Device
- Filter Cleaning: Periodically clean the device’s filters to prevent clogging. Dirty filters can significantly reduce the device’s efficiency.
- Pipe and Gauge Cleaning: Use a soft cloth to wipe down the pipes and gauges, removing any dust or residues that might affect measurement accuracy.
Second: Pump Inspection
- Check Pump Operation: Regularly inspect the vacuum pump to ensure there are no leaks or malfunctions that could compromise its performance.
- Oil Replacement (if applicable): If the pump uses oil, make sure to change it regularly to maintain optimal efficiency.
Third: Sensor Checks
- Pressure Sensors: Verify the accuracy of the pressure sensors to ensure reliable readings. Calibration tools may be required if discrepancies are noted.
- Other Sensors: Ensure all sensors are functioning properly and are correctly linked to the control unit.
Fourth: Maintaining Pipes and Valves
- Pipe Inspection: Examine the connected pipes for leaks or blockages that might impede gas or liquid flow.
- Valve Functionality: Confirm that the valves operate smoothly and are free from defects that could disrupt refrigerant distribution.
Fifth: Electrical Unit Maintenance
- Wires and Connections: Inspect the wiring for wear or damage. Ensure all electrical connections are secure.
- Power Supply Test: Verify that the device receives the appropriate voltage (220V or 110V as specified) and check for any power irregularities.
Sixth: Database and Software Updates
- Update Software: Regularly update the device’s software and database to access the latest features and improvements.
- Backup Data: Ensure reports or stored data are backed up regularly to prevent loss.
Seventh: Printer Inspection
- Printer Condition: Check that the printer is functioning correctly, and that the paper and ink are in good condition.
- Replace Ink and Paper: Replenish ink or paper as needed to ensure clear and professional maintenance reports.
Eighth: Avoid Improper Use
- Handle with Care: Avoid pulling wires abruptly or applying excessive pressure to buttons. Operate the device in accordance with the user manual.
- Pressure Limits: Ensure the system pressure does not exceed the allowable limit (20 bar) to prevent damage.
Ninth: Tank and Bottle Checks
- Inspect the Tank: Regularly check the tank for any build-ups or leaks that could affect gas recovery.
- Monitor Bottles: Ensure the new and used oil bottles are stored correctly and remain in good condition.
